In this video, I will show you three different methods of how to extract your subject from a background. I’ll explain when to pick one technique over the other. I’ll also extract from plain and busy backgrounds and show you how to extract objects with small details, such as hair.
Photoshop Technique: Extractions
↧
↧
Photoshop technique: Retouching hair
In this video, you’ll learn how to retouch hair in Photoshop using the clone tool in darken mode. By using the clone tool, you’ll be able to achieve natural results in a short amount of time.
See more free videos samples and check out my Beauty & Hair Retouching DVD.
↧
How cinematic color grading is actually done
There seems to be an interest, as well as a bit of confusion, as to how color grading is done for cinema (which includes video). I’ve read the various threads on MM and, while there is some great information, there is unfortunately a lack of understanding as to how the process works on larger budget film. This is exacerbated by the plug-in manufactures that provide color tools that do not provide the kind of power necessary to really do the work—Magic Bullet and Colorista come to mind, as they were referenced in the MM forum before. There may be new plug-ins that do what I’m going to describe, but since I don’t use them, I’m only going to comment on what I saw posted on this site.
Don’t get me wrong, these new plug-ins have some nice presets. However, I’m pretty sure that once the actual process is explained, some individuals will find that Photoshop is better for smaller jobs, and that Da Vinci’s Resolve (or Apple Color, which has apparently been discontinued) is preferable for longer works.

Color correction vs. color grading
The reason those aforementioned plug-ins don’t work all that well is because they only offer global changes, and that is only part of the process. In order to understand the entire process, we first need to understand the difference between color correction and color grading. First off, color correction refers to normalizing footage for color balance and setup.
When shooting digitally, color balance isn’t such a big issue because we can generally do a custom white balance prior for each scene—but that wasn’t always the case. With film, for example, you only had daylight-balanced film and tungsten-balanced film. Even if you were shooting daylight-balanced film in daylight, the actual color temps could still fluctuate quite a bit depending on the intensity of the light (just as with still photography). Shooting tungsten didn’t have as much variation, but even different batches of film could have slight differences in color temp. Because of this, we needed to constantly correct all the footage so that we had a consistent white point from which to begin grading. Also, we wanted to normalize our levels: we refer to levels as lift/gamma/gain—lift is our black point, gamma our mid-point and gain our white point. Again, we’re not trying to be creative here, just trying to correct the footage for consistency. These changes are global in nature.
Color grading is where we make creative changes to create a “look” for the film or a particular scene within it. These changes are localized. Because of this, we use several different “rooms” to accomplish any color alteration (today these “rooms” are just tabs in a program, but there was a time when they were actual, physical rooms).


The rooms
So, let’s say you want to do that teal-in-the-shadow or cream-pink-in-the-highlights look. What I’ve seen discussed on the threads is to simply pull your shadows towards teal or your respective highlights toward pink until you create a balance; however, these are global changes and not how we would really go about doing this.
Instead, we would separate those actions into two of our secondary rooms. The first would use an HSL (hue, saturation, luminance) mask to isolate the shadow tones, and we would grade those tones toward teal, without affecting the rest of the image. Then we would open another room and select the highlight tones we wanted to alter and adjust those toward pink. Next, we would open up a third room to handle our mid-tones or maybe only our skin tones.
After all that is done, we might open up a few more rooms to make changes to certain specific elements, such as the sky, an open doorway, or a person in shadow. We might use ten or more of these secondary rooms to get the look we want. Better systems have the ability to work with nodes, which allows for very complex selections and actions.
After all of our secondary work is done, we go to our “Primary Out” and make necessary tweaks to the overall look. As with the “Primary In,” these changes are global and corrective.
Plug-ins that only allow for global changes are fine for insta-looks, but they lack the necessary power to really dig into an image color-wise.


↧
Creating art from photos
I recently received a commission from a beautiful, young model on Model Mayhem, Veronika Leo. She wanted me to draw a sultry pinup of her, based on one of her photos. After much deliberation, we decided on the photo below as a reference.
The image was specifically chosen by Veronica. We did go through several of them, but she liked this one because of her sultry expression. When she realized that I could “create” lingerie out of a bikini, so to speak, that settled it.

Model: Veronika Leo
Veronica asked me to transform the original photo into “A pinup type of look… with lingerie… very sensual,” as a special gift for her boyfriend. She already had lingerie pictures in her portfolio, but I wanted something a little bit different. So, after I laid out the drawing from the original reference, I started to sketch in some of the details and mulled over what type of lingerie I could create.

Model: Veronika Leo; Artist: Vincent Wolff
The trickiest part of smaller portraits like this (14 inches x 17 inches) is getting the drawing to look like the subject, not just the photo reference. I usually hang different views of the model around my drawing board, to remind me what she looks like. At this point I was working to get a lot of detail in on Veronica’s face, before moving my way down. I knew she’d be wearing thigh high stockings, I just wasn’t sure about the actual lingerie outfit.
The cut off feet have been a point of contention. Some people don’t like it, but I wanted to get as much into the 14×17 format as possible. It’s isn’t easy drawing half a foot, but I used a great MM pinup model as a reference and that was invaluable. It gave me a perspective of the shoe and stockings, so I could fill in details that weren’t in the original photo.

Model: Veronika Leo; Artist: Vincent Wolff
I played around with the lingerie a few ways, and kind of organically came up with an outfit that I thought worked. Then it was just a lot of shading, detailing, etc., before I finished up.

Model: Veronika Leo; Artist: Vincent Wolff
Veronica was such an inspiration for me to draw. She’s a beautiful young lady, and very expressive in her poses. Her input was invaluable, and she was very excited about the art when she picked it up. We hope to work together on something again very soon.
↧
Photoshop tip: Opacity vs. fill
In this video, I discuss the main difference between opacity and fill for layers in Photoshop. For instance, opacity can affect all layers (including layer effects) in an image, while fill only affects the layer content and not the layer effects. I’ll also show you how to create a “flare effect” using the fill option.
See more free videos samples and check out my Beauty & Hair Retouching DVD.
↧
↧
Model Mayhem Digital Artists of the Year: Andreea Cernestean
Andreea Cernestean is a self-taught freelance digital artist with 7+ years of Photoshop experience. Andreea recently won the Bronze Medal, as voted for by members, in the Model Mayhem Digital Artist of the Year contest.

Digital Artist: Andreea Cernestean
Her digital art started as an after school hobby and two years later became a means to support herself while in college. Five years later it’s her profession as a freelanced digital artist.
Andreea likes to diversify the themes and looks of her digital art, often switching from fantasy and sci-fi to dark and surreal. She takes inspiration from the original image and then let’s her creative talent and imagination do the rest.
Check out Andreea’s Model Mayhem portfolio and personal website to see more of her art.
↧
Model Mayhem Digital Artists of the Year: Baden Bowen
Baden Bowen is a UK based photographer and digital artist. He recently won the Silver Medal, as voted for by members, in the Model Mayhem Digital Artist of the Year contest.

Digital Artist: Baden Bowen
See more of Baden Bowen’s portfolio and follow him on Facebook.
↧
Model Mayhem Digital Artist of the Year: Joe Diamond
Joe Diamond is a digital artist based in Bucharest, Romania. She eschews any particular style and takes inspiration from the model’s pose, often transforming an image into artworks that range from colorful fantasy to dark Gothic.
Joe recently won the Gold Medal, as voted for by members, in the Model Mayhem Digital Artist of the Year contest.

Digital Artist: Joe Diamond
See more in Joe Diamond’s Model Mayhem portfolio and follow her on Facebook.
↧
Photoshop tips: How to lighten skin
In this video, you’ll learn how to lighten an individual’s facial skin tone in Photoshop. The process involves duplicating the background, as well as adjusting the image’s overall saturation levels. With practice, this technique can be mastered rather quickly.
See more free videos samples and check out my Beauty & Hair Retouching DVD.
↧
↧
The Model Mayhem interview: Michael O
Michael O is a professional digital artist from Central California. His imaginative use of post-production software has garnered him quite a following, as most of his artwork — which exhibits a captivating blend of futuristic and classical motifs — is accomplished using photo-manipulation software. His work has been featured on several covers of Advanced Photoshop magazine, as well as various book covers for Macmillan and Little Brown & Company publishing. He also designs movie posters for the Bollywood film industry in India.
Michael’s submission won the Model Mayhem Banner Contest, and his work with Mosh greets everyone that visits MM. We recently had the chance to chat with Michael O about his life and art.

Model: Mosh
MM Edu: Tell us about your background and how you got started as an artist.
Michael O: My oldest memory of anything art related in my life happened back in kindergarten. I can remember drawing in class, wondering why my picture of Scooby Doo was more detailed than everyone else’s. I knew even then that art would always be in my life. While a lot of people do not know what they want to do halfway through college, I had a big head start and I let art lead me wherever it wanted.
MM Edu: I’ve read you describe your work as “Photo manipulation on steroids.” How did your work develop creatively?
Michael: Although I do not condone steroid use in real life, I do try to inject as much of it as possible into all my work… and I have yet to see any negative side effects!
In the years prior to college (the late 1990s), my focus was on traditional art. My favorite style was photorealism and I would always find ways to cheat — like using a projector to trace photos onto a canvas and turn them into paintings. The style I use today is actually very similar to that. I start with a photo, and I “paint” directly on top of it. It is a simple process, but there are a few unique tricks and a few extra hours of detailing that separate my style from regular photo manipulation. The style really developed on its own while I played around in Photoshop, learning various techniques through trial and error.
Some people have asked why I choose to do photo manipulation rather than creating artwork from scratch, and I tell them that not only do I suck at drawing from memory, but also that removing the live model from my work would be removing the best part of the process. Knowing that another person is required makes the work feel more real to me, not just visually. It also gets me out of the office to meet new people, most of which are beautiful women. I have no regrets.

Under My Skin: This artwork required about 5 different shots pieced together in Photoshop in order to get all the hands placed in the right spots.
Model: Dani Bae
“I start with a photo, and I “paint” directly on top of it. It is a simple process, but there are a few unique tricks and a few extra hours of detailing that separate my style from regular photo manipulation.”
MM Edu: You have a futuristic style but it’s clearly influenced by classical art and sculpture — how would you classify your work?
Michael: I personally do not believe that art has surpassed or even matched the work created during the Renaissance. I find that artistic period to be the pinnacle of beauty and the best example of human ideals. I look up to artists like Michelangelo (no relation), who still inspires thousands through his work. I try to keep an eye on the big picture and if I devote my life to a timeless style of art, maybe hundreds of years from now, it will be my work that people are lining up to be inspired by. Not everyone was given a natural ability in art, so I have to use it responsibly and to the best of my ability in order to respect this gift that I was given.

Model: Maria Gruner

Model: Ranie Jade
“I personally do not believe that art has surpassed or even matched the work created during the Renaissance. I find that artistic period to be the pinnacle of beauty and the best example of human ideals.”
MM Edu: I’d like to talk about your creative process — from developing the concept to selecting the model and the specifics of the shoot.
Michael: One of the most important aspects of art to me is having a good concept. I try and think of ideas for art that need no explanation and can be clearly understood by anyone. Inspiration for a good concept can come from anywhere so I keep my eyes, ears and dreams wide open for ideas to come find me. I just have to remember to write them down.
I know that I am prepared to create a new image when I can clearly see the concept in my head. The actual look of the model is not vital, because so much can be changed in the computer. I try and keep photo shoots simple, not doing more than two or three concepts per model so that I do not get overwhelmed. For each concept I take about 50 photos, changing the lighting and poses until we get it right.
Models often tell me that I am physically demanding on them. I suppose that is because I try to keep them in one pose for a minute or so, and for some of my robotic images the poses are rather awkward. It helps if the model has an acting background because the facial expression is key, and that is one thing that is very hard to change in the computer.
Ever since I’ve been shooting, I have been using a 10D, which was one of Canon’s first digital cameras. It is nothing special as far as quality and features go, but super high quality photos are not a vital part of my work. In fact, one thing that I have learned over time is that people love to see the before photo that I use for the artwork. The more plain and simple the photo is, the more impressed they are by the transition.

Two Locks, One Key: This was a funny shoot because we were in Central Park and every now and then a tourist would pass us and a few seconds later I would hear their camera click behind me.
Model: Kess M
“One of the most important aspects of art to me is having a good concept. I try and think of ideas for art that need no explanation and can be clearly understood by anyone.“
MM Edu: And, let’s talk about your process after the shoot. How do you turn those raw images into such incredible pieces of art?
Michael: Like my stubbornness to upgrade my photography equipment, my workstation is the same. I use Photoshop CS2 (and I would probably still be using an older version if my computer could run it). I use only the most basic tools so there is really no need for the latest and greatest. Those who expect the computer to be a magic box are often disappointed when I tell them that everything in high-quality work is done from scratch and it takes years of practice.
I also use a mouse 95 percent of the time. I have a tablet and I use it for long strokes for elements like hair but other than that I have no use for it, and frankly I do not know how designers can use them all the time. Whatever works I guess.
The digital process can take between 10 and 25 hours per image. I always try and spread it out over a few days so I can sleep on it and come back to it with a fresh pair of eyes.

I designed this desk in 3D Max and had a local craftsman build it for me. The monitor on the left is for one computer that I use for music and email. The center monitors are connected to my main computer, which is where I do all my work.
MM Edu: You often shoot overseas. How does traveling affect you creatively?
Michael: I have not been able to put my finger on it, but I believe there is a connection between traveling and artistic inspiration. I almost feel like a different person when I travel, my emotions are heightened. Combine that with exotic locations and exotic models, the output during my travels has become some of my most successful work.

Soul Searching, in New Zealand
Model: Megan Solomon

Model: Maria Shanti

Model: Maria Shanti

Hong Kong: I bought her this dress for $12 and we walked around and shot in some of the touristy areas of town. Everyone kept asking if she was a famous model. Of course, I told them yes!

Shooting in Moscow, Russia None of the models I worked with there spoke English, so my instructions needed to be translated.
Photographer: Olya Kraynova

Models: Olya Kabulova & Natasha Semenova in Russia

Model: Rebecca Davies-Jones
MM Edu: What advice do you have for aspiring digital artists?
Michael: For those who are looking for a career as a freelancer, this is my advice.
- I would first recommend honing your traditional art skills to a level you are happy with before making the transition to digital. The methods are the same and the knowledge you gain from traditional rules (like composition) will pay off when it comes time to go digital.
- No client has ever cared where I live. As long as you have an internet connection, you can live wherever you want.
- For program learning, I would recommend The Gnomon Workshop DVD tutorials. They have plenty of step-by-step lessons focusing on all aspects of digital art. But, if you are more like me and not interested in this teaching method, I would recommend a few years of trial and error and a lot of elbow grease!
- For real professional artists, skill in art is only half the battle. A strong understanding of modern global business practices is necessary in order to find clients and keep them. Things like missing deadlines and making excuses are not tolerated.
- Get your work onto as many community-based websites as possible. You never know who might see your work there. That is actually where most of my clients first saw my work.
- Do not expect to get rich by selling your work in a gallery. With digital art there is no original piece of art so the best you can do is sell prints or merchandise.
- Lastly, find your own style that suits your artistic desires. I do not believe I would have any satisfaction with my own art if people told me that it looked just like someone else’s.
MM Edu: Model Mayhem is as essential platform for your work, can you tell us how you use MM and what it means to you?
Michael: After about a year of developing my digital style using stock photos, I went out in search of my own models. Model Mayhem was the obvious choice for that and I have been using it continuously ever since. Not only has it been an essential part of making my artwork happen but it also gave me the first few commissioned jobs from photographers who saw my work here and wanted to pay me for my services. At one point, more than half of my income was coming from commissions through MM. On top of that, I have made some lifelong friends here who share my passion for art and photography.
If there is a downside to the process of finding a model, it’s that I only get a response from about 20 percent of the models I contact. So, I contact about five models expecting to hear back from one. After that, there is still a big hurdle to making the shoot happen. I find that the models that are most likely to show up are those who answer all my questions and include their phone number in messages.
If I do get a response from more than one, I will pick the model that seems the most enthusiastic about art, will bring the most life to the work, and is not just a pretty face.

Original photo by Terry Divyak: This was a birthday present for his daughter and it was the first artwork commission I ever had.
Original photo by Terry Divyak
MM Edu: Your submission was selected to be the new Model Mayhem banner. Can you tell us about that shoot with Mosh?
Michael: That shoot was actually a classic Model Mayhem story…
It took place in 2007 when I was pretty green when it came to photography. My trusty 10D and I were headed to Washington D.C. to visit a friend and, (as with most of my travels) I contacted a few models through MM in hopes of having a shoot while there. I came across Mosh’s portfolio and, like everyone, I was instantly impressed with her work. She responded happily and was interested in shooting. I did not have any lighting equipment, so I was expecting to shoot outside, but she knew someone with a studio. I was glad to hear that but when I arrived, it ended up being someone’s studio apartment and not a photography studio!
My 50mm lens on a cropped sensor body made it pretty difficult to shoot at that focal length in such a small space. We had to move some furniture around but we made it work. The guy who owned the place had an Alien Bee which was all I needed. I brought some pictures of poses for Mosh to emulate, but she did not need them. All I had to do was sit back and click away. Every shot was a keeper and I am not surprised that she has become such a big name in the modeling world.

Model: Mosh

Model: Mosh

Model: Mosh
MM Edu: And, how do you feel knowing your work is in front of everyone that comes to MM?
Michael: I have had a number of honors over the years but winning this banner contest feels special to me since Model Mayhem has been such an important part of my career. I am sure that every time I log in I will have a little smile on my face.
MM Edu: Well, thanks for your time and congratulations! We obviously love your work and think everyone else will too.
Michael: Thank you.
↧
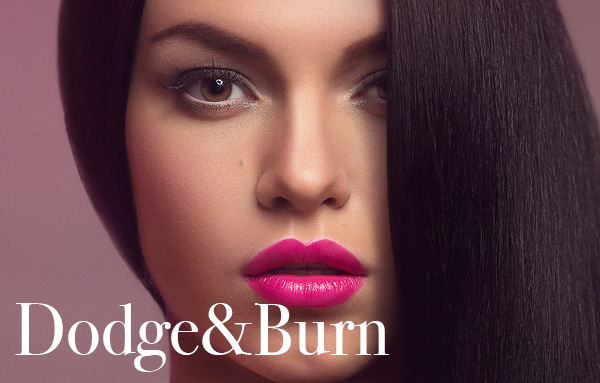
Dodge, burn and color your image with curves
Dodging and burning your images through curves adjustment layers is a great way to ensure that the toning you’re applying is actually consistent with your source photograph. On colored lighting shots, like the one in the video, you can also add color through the color channels in your curves adjustment layer. This enables you to color the shadows and highlights to match the rest of the image.
Photographer: Jake Hicks; Model: Zuki Jai
↧
Photoshop Tips: How to Dodge and Burn Like a Pro
In this tutorial A-M-P shows how to dodge and burn like a pro. If you’re still using the dodge and burn tools in Photoshop you need to watch this tutorial.
↧
7 Tips for Aspiring Digital Artists
Michael O is a professional digital artist whose work has been featured on several covers of Advanced Photoshop magazine, as well as various book covers and movie posters.

Model: Shannon Shhhhh; Digital Artist: Michael O
For those who are looking for a career as a freelance digital artist, this is my advice.
Learn Traditional Art Skills
I would first recommend honing your traditional art skills to a level you are happy with before making the transition to digital. The methods are the same and the knowledge you gain from traditional rules (like composition) will pay off when it comes time to go digital.
Location, Location, Location – Not for Digital Artists
No client has ever cared where I live. As long as you have an internet connection, you can live wherever you want.
Program Learning
For program learning, I would recommend The Gnomon Workshop DVD tutorials. They have plenty of step-by-step lessons focusing on all aspects of digital art. But, if you are more like me and not interested in this teaching method, I would recommend a few years of trial and error and a lot of elbow grease!
Business Skills
For real professional artists, skill in art is only half the battle. A strong understanding of modern global business practices is necessary in order to find clients and keep them. Things like missing deadlines and making excuses are not tolerated.
Online Community
Get your work onto as many community-based websites as possible. You never know who might see your work there. That is actually where most of my clients first saw my work.
Prints and Merchandise
Do not expect to get rich by selling your work in a gallery. With digital art there is no original piece of art so the best you can do is sell prints or merchandise.
Develop Your Own Style
Lastly, find your own style that suits your artistic desires. I do not believe I would have any satisfaction with my own art if people told me that it looked just like someone else’s.
Read the full interview with Michael O.

Digital Artist: Michael O; Model: Mariel Zagunis (Two time Olympic Gold Medalist)
↧
↧
How to Use Textures in Photoshop to Enhance Your Photos
In this video, Lindsay Adler explains how to add depth and dimension to your images by overlaying textures.
↧
Photoshop Tutorial: Retouching Hair
In this video, you’ll learn how to retouch hair in Photoshop using the clone tool in darken mode. By using the clone tool, you’ll be able to achieve natural results in a short amount of time.
See more free videos samples and check out my Beauty & Hair Retouching DVD.
↧
Dodge and Burn Tutorial
Dodging and Burning is a method of lightening and darkening specific areas of an image, regulating local exposure to even out texture and contours. It digitally acheives (and with much more control) an old darkroom technique of witholding light (dodging) to keep an area light, or increasing the exposure to darken (burn) areas.You’ll find the dodge and burn tools on the toolbar to the left of the default Photoshop setup, or by pressing ‘O‘.The problem with using the standard tools is that they work destructively, they won’t operate on a blank layer so you’ll be making permanent changes to your working layer. This would be fine if none of us ever made an error or changed our minds, but to give us the option, we have a couple of methods available.
I split my workflow into two parts, pixel level dodge and burn, and carving. For pixel D&B I use the Curves method outlined below to even texture whilst zoomed in from 100% to 400%. Carving is more about shaping the contours of the face and enhancing contrast, and I like to work at 50% view or less to keep the whole image in context. I often do this second step on a 50% grey layer, my own preference and the choice is ultimately up to you.
The Curves Method and Pixel D&B
You can do this a number of ways using a number of other adjustments, but the premise is this; you increase lightness using an adjustment layer, you mask it out with black, and on the mask you can then paint the effect back into the required areas with white. You decrease lightness on a different adjustment layer and treat it the same way. Others may use different adjustments for this, I use Curves which is why I’ll explain this method here. I’ll be using RGB, and the following assumes some familiarity with curves, masks and adjustment layers.
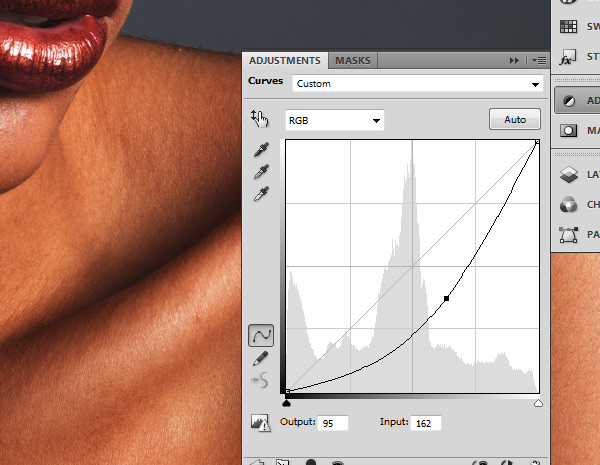
Open a Curves adjustment layer and with a single point pull the midtones up, this will be your dodge layer;
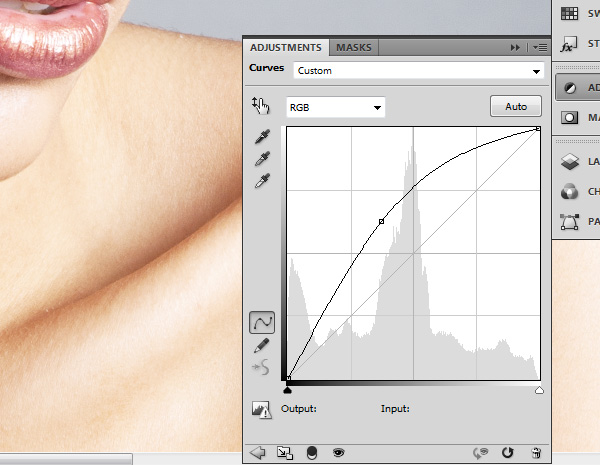
Fill the mask with black, hiding the effect of the curve (by default the mask should be selected and pure white, so just hit Cmd/Ctrl+I to Invert);
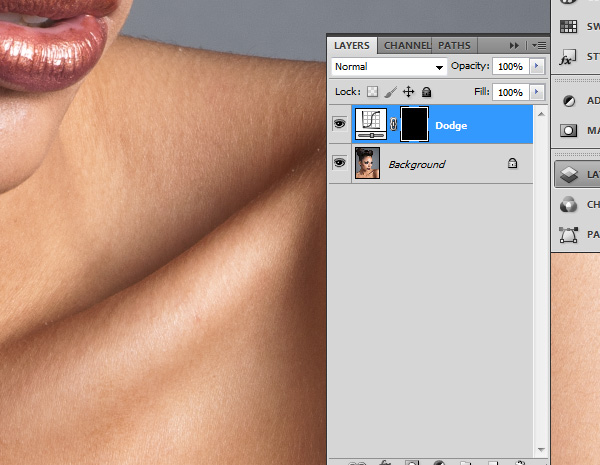
For the burn layer, start a new Curves adjustment and pull the midtones down with a single point;
Invert the mask and name this layer Burn;

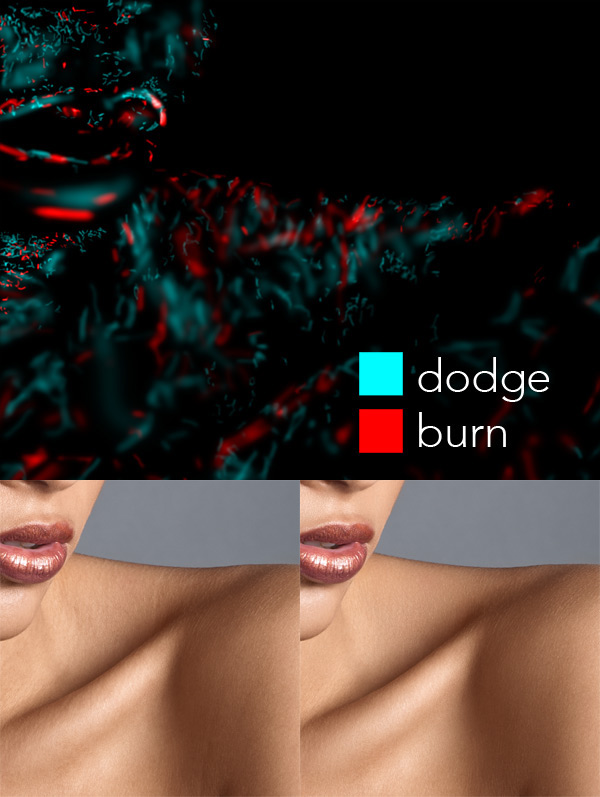
Paint with a soft white brush onto the Burn mask to darken, and the Dodge mask to lighten.
My preference is to use a low Flow setting, between 1% and 5%. Many use Opacity but I prefer the ability to build up the effect in one stroke instead of lifting the pen.
This is a composite of the two masks after dodging and burning, coloured to distinguish the lightened areas from the burned, and the result;
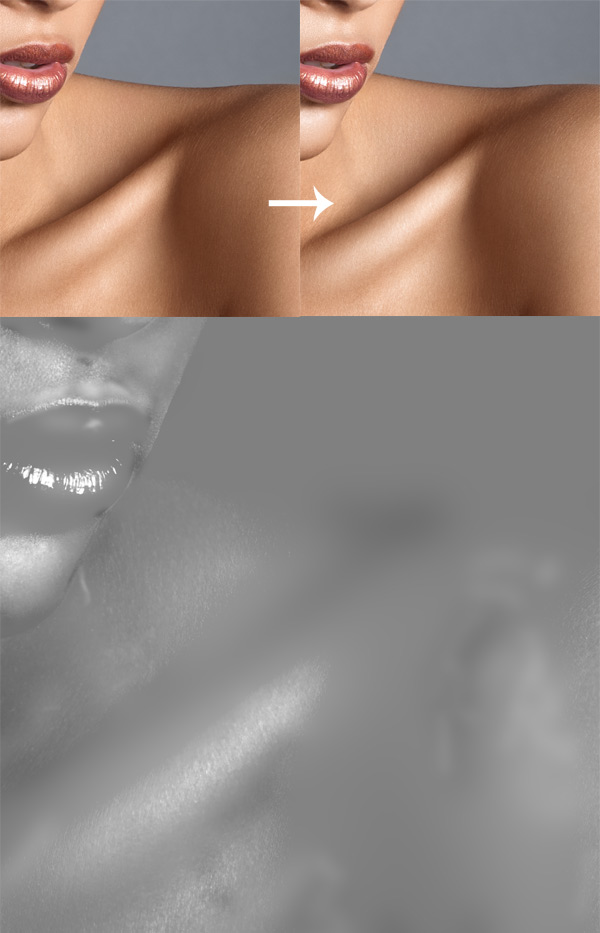
Carving and 50% Grey
The next part of my workflow involves adding contrast and contour to shadows and highlights. To demonstrate this using the 50% grey layer method, select Layer>New>Layer and in the resulting dialog box select Mode: Soft Light and check the box next to ‘Fill with Soft Light neutral color (50% gray).
You can paint onto this layer with black or white, or indeed any colour but as we’re dealing with luminosity stick to black and white. Again using a soft brush with a low Flow/Opacity zoom out so you can see the whole image or most of it, and you can accentuate the shadow and highlight or even alter the appearance of shapes. Remember that generally, lightening an area makes it appear closer, darkening helps it to recede.
In the below example, I’ve also selected the whites of the image (using Select>Color Range) and filled them with white to accentuate the highlights further.
↧
Becoming a Freelance Retoucher
Going freelance is always a daunting prospect. You trade the stability of a constant paycheck for the uncertainty of making your own brand and telling the world who you are. It’s thrilling, slightly terrifying, and one of the biggest decisions you’ll make in your life.
I’ve been a professional retoucher for over five years now. Before that I’d spent a similar period of time with Photoshop and retouching through graphic design. The transition for me was an easy one — as retouchers we have a template to work from (the photo) and my design jobs that included photography were always the ones with the highest rate of client satisfaction.
That said, to build up to the point where you’re paying the mortgage, bills, and luxuries (llama rental, pig riding weekends, forklift truck racing…normal stuff) takes an extraordinary amount of dedication.
Build Your Portfolio

Retoucher: Daniel Meadows - for Grazia
I haven’t seen a better place to find freely available high-quality shots to build a first book from than Model Mayhem — if you’re here reading this then you’re in a very good place to begin. With a solid base to start from, build towards a book or two that clearly displays the direction you want to take. I don’t promote any services for weddings, for example. Although you may wish to, I’ve always politely declined batch processing jobs because I simply don’t enjoy them — my portfolio reflects my specialization. Keep your books up-to-date and drop anything that is no longer representative of your ability (full disclosure: I write this last tip as much for my own benefit as for anyone else’s. I drastically need an overhaul this summer!)
Learn the Right Skills

Retoucher: Daniel Meadows - for Grazia
There’s a lot of awful retouching advice on the internet. I can’t speak for the studios that cheaply batch the process with plugins, but I can tell you that if you develop a skill set that’s demanded by the commercial retouching industry, you’ll be surprised by the budgets set aside for post. I’m not a particular fan of the term ‘High End,’ although I’ve adopted it; ‘High End’ is the new ‘competent professional.’ The explosion of interest in the cheaper end of the market moved the bar.
Cutting corners, saving time, and doing the bulk of your skin work with filters (including Frequency Separation blurring) will hamper your progress in the commercial field. That quick fix market is saturated, and there’ll always be someone willing to do the same thing for a dollar less. Be someone who provides a service for which paying a premium is worth it. Work on color management, your dodge and burn skills, and learn to get the best from your RAW files.
One of the best pieces of advice I can give you is this: get your inspiration from the right sources. I subscribe to one of ‘the two big’ fashion magazines, and it arrives through the door at home every month. A friend picked one up from the coffee table a few years back and told me I’d “been ripped off — it’s full of ads!” I told him that was the point. It’s easy to get drawn into competing with your peers as you learn, and that’s a sure way for the whole group to amble off the path. Make sure you’re the one who keeps an eye on the actual goal, and takes strides towards it.
Practice

Retoucher: Daniel Meadows - for Grazia
Your early work will probably be, as we say in England, absolute bobbins. If you do it the right way, it’ll probably be worse. This is because as plugins and quick fix techniques have proliferated and improved, it’s become relatively simple to achieve often adequate results for little time. For beauty work in particular it’s vital not to rely on ‘adequate’ at the expense of the hundreds of hours of dodge and burn practice you should be acquiring over the start of your career. Frequency separation is a wonderful tool, but don’t be tempted to use it as your go-to skin smoothing technique. (That remains D&B — no plugin or filter will be an adequate substitute.) The more you learn and apply to great shots with an appreciation of what a high-quality output looks like, the more proficient you’ll become.
Learn about color theory. Learn about what looks are in demand for fashion, editorial, beauty, movie posters — whatever your specialization is, know it thoroughly and learn how to apply treatments. A client might send you a mood board for reference and it’s vital to know how (and if) it can be achieved. Make sure you can balance a set of images properly taking into account hue, saturation, and contrast relative to the shadows, mids, and highlights.
Network

Retoucher: Daniel Meadows - for Harper’s Bazaar Arabia
Be seen, chat, ask questions, show off your progression as an artist and help the people following you. There are plenty of places to do this (MM is a great example). The internet has made the world a much smaller place, so use it to your advantage. A few weeks ago I was walking around Manchester, England, surrounded by huge billboards carrying a major ad campaign I’d worked on. This week I have a fashion editorial featuring my favorite assistant from Doctor Who. Both clients reached me online — you no longer have to be in a major commercial center to compete. Join forums, join groups, (I’ve started a new retouching group on Facebook that might interest you) and engage with people. Collaborate to build the quality of your portfolio and build and maintain business relationships.
Build Your Brand

Retoucher: Daniel Meadows - for Harper’s Bazaar Arabia
Your brand is you at your best. I get friend requests on my personal Facebook page that I understand to be work related, so I leave them unanswered, often politely directing them to Daniel Meadows – Retoucher instead. Daniel Meadows is a brand. Between you and me, Danny is the guy my mates know whose photographs are usually of some ridiculous night out, and who gets sweary about politics and nervous about playing guitar at open mic nights. That’s the “you” whom you can share with a small circle of clients and peers if you choose to, but keep your official pages on-brand. No dinner Instagrams, no conversations with your friend about weekend plans.
Don’t Undersell Yourself

Retoucher: Daniel Meadows - for Luis Vuitton
I can’t stress this enough. I regularly see threads on forums where someone asks if a fee that is less than a living wage is ‘too much to charge.’ You’re a businessperson and you must think like one. Sensibly speaking, if your level of work can be replicated by an amateur, then charge accordingly, and treat it as supplemental income while you build your skill set. When you’re ready to build a real business, you must charge realistic rates. Freelancers must take downtime into account. If you expect a certain annual profit (after expenses) and estimate your billable working hours will be a fraction of an average 40-hour week, then your hourly rate needs to reflect that.
↧
↧
How to Enhance Texture and Detail with Intelligent High Pass Sharpening
Learn how to sharpen portraits in Photoshop with a unique variation of high-pass sharpening. This technique prevents fringing that is typically caused by the high pass filter and works well for skin texture.
↧
How to Whiten Eyes Naturally in Photoshop
In this video you’ll learn an intuitive approach to whitening the sclera (whites) of the eye while retaining a natural look to your image using Photoshop.
↧
Color Grading With Curves
Learn how to do color grading with the curves adjustment panel in Photoshop.
↧
More Pages to Explore .....


