Quantcast
Channel: Post-Production – Model Mayhem Blog
Viewing all 30 articles
Browse latest View live

Retouching with LUTs

$
0
0

Before saying anything I would like to point out that this is not a tutorial, not a universal recipe or a quick and easy solution for post-processing work. One who is serious should always explore and learn new things. Certain tool names will inevitably be mentioned but that is for the sake of sharing useful information, not for the purpose of recommendation of a best way or for the promotion of a particular product or brand. Tools change all the time but the principles remain. There is also no claim that you will find here something sensational or never seen before. I am not your teacher and you are not my students. We are just people who all learn and share together and this short article is simply an answer to some of the questions I received from many photographers and retouchers about working with LUTs.

What is a LUT

The term LUT used here is an abbreviation of look-up table, more specifically a color look-up table. In short it is a way to instruct the computer how to change certain colors of the input image (source) to other colors (target). If you are interested in more detailed technical explanation here is a link: Color look-up table

Why LUTs?

We have been struggling with Photoshop’s tools for color correction for many years. We have been offered all kinds of clever solutions such as luminosity and other masks, curves presets, action presets, plugins by various vendors. Today we have the ability to use LUTs as adjustment layers and this has been around for a while. However it seems few people use this ability for various reasons: either because of the safety of sticking to old traditional workflows or because they were told “LUTs are for video”, or because they don’t have any usable LUT files to work with, or because someone they admire recommends something else. But if you spend the time to see and understand the efficiency which LUTs offer you will know how to replace the 20 layers you add for achieving a particular look with just one layer. And this means smaller working files, less memory required and hence faster and easier work.

Examples:

Here are examples of what a single Color lookup layer (LUT) can do. The same thing would need multiple other adjustment layers which are not as powerful and maybe even masks which introduce their own problems.


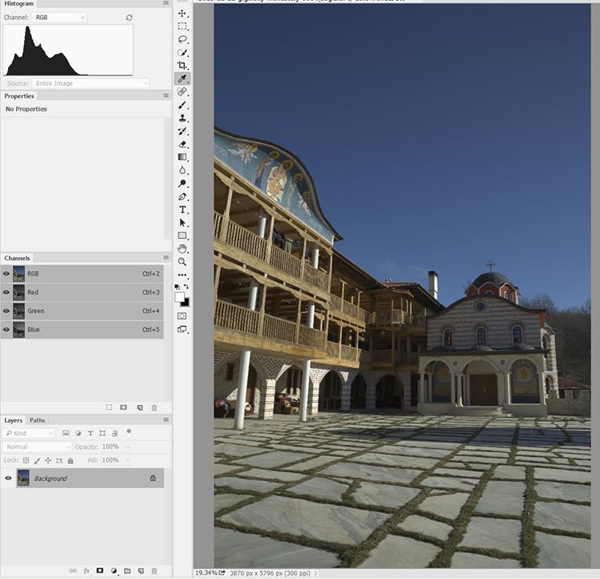
Before applying the LUT layer (raw look)


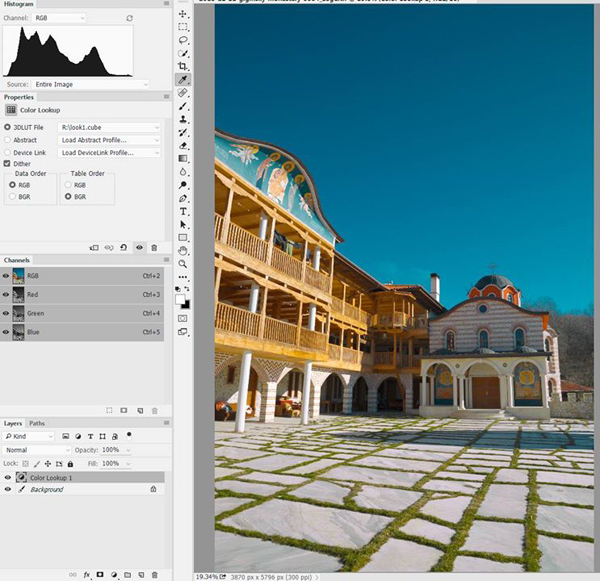
With a single LUT layer


Left: before, Right: after applying a LUT

Download the LUT file (ProPhoto RGB color space)

Download the LUT file (sRGB)

Apart from the obvious benefit of easy creation of different look presets a LUT can be very helpful in the raster level retouching as well. Here is an example of how using a LUT can visualize better the areas which need work:


Unretouched image (cropped)


Same image with a helper LUT showing areas which need chromatic correction.

Note that this would not be possible to do in RGB if you are simply adding a desaturation layer and a curve on top of it, which is the traditional way of doing D&B. I won’t go into all this because it is a subject on its own and won’t fit in here.

An important note

Input Matters

A LUT translates one set of RGB values to another. It is very important to note that although LUTs are an easy way to create presets for different looks, one LUT cannot fit every image because RGB values are not enough on their own to define color. Every image needs a color profile which defines the meanings of RGB values. In other words RGB values are just an instruction for the device/software which in combination with the color profile define the actual color which will be displayed or printed. In that sense a LUT which is made for sRGB obviously won’t reproduce the same look if applied on an image with Adobe RGB profile.

Creating LUTs

There are different ways and tools to create LUTs. A LUT file being basically a text file is obviously not something you would want to type by hand – you need a visual instrument for that. Most of the software tools which are able to generate LUTs are indeed focused on video/cinema and it makes sense – for motion picture you cannot create mask for the sky for each and every frame, you need to define a procedure for it and LUT is a convenient way to do that.

You can export LUT files using Photoshop too. Try to add a few adjustment layers (do not add layer masks, they cannot be stored in LUT) then use File->Export->Color Lookup Tables:

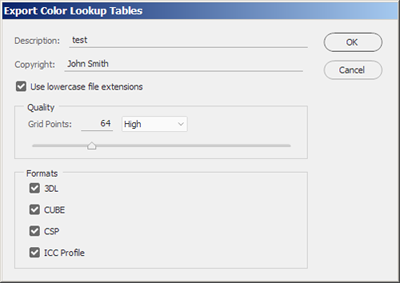
Usually what you want is 3DL or CUBE

This will give you a single .3dl or .cube file which you can load in a Color lookup layer. However the adjustment layers in Photoshop are quite limited and you still won’t be able to get the full power of LUTs. The “flattening” of multiple adjustment layers to one single LUT layer can help you work more efficiently but in Photoshop there is no tool which can help you shift for example: dark reds to bright greens and at the same time preserve bright neutrals while also moving light blues to yellow. For anything like that you would have to construct your own layer rig, maybe even use masks or different color models (like CMYK or LAB). Why is it limiting? – Because every time you retouch the image underneath the adjustment layers on top have to be re-applied and if they contain masks you would have to regenerate the masks. Or if you decide to retouch after applying color correction, that means you are stuck with that color look and should not change it any more (or you have to add more layers and masks after retouching and all the rest of it – huge files, slow work).

There is a tool which has been around for a few years, called 3D Lut Creator (3DLC). When I found for the first time it wasn’t as powerful but today it is very good and constantly improving. It has the simplicity of being fairly intuitive to work with if you understand how color works. I have asked my friend Oleg Sharonov (the creator of 3DLC) to expand more on the technical side of working with LUTs in photo retouching. We often have lengthy discussions about that and improvements in the program so I am sure the short additional notes by him will be helpful:

“I agree with everything you said so far. The main idea is that masked corrections produce discontinuity of L, A, or B components. So having the whole correction in form of a 3D mesh gives you control of the shaping of these components instead of cutting the color space. Photoshop doesn’t give you much of analysis tools too. I made vector-scope for Photoshop far before making 3DLC. I took a screenshot and analyzed it. So now we’ve got much more analysis tools than any video editing software, not talking about Photoshop. Another thing which is specific about 3DLC is that no other application can edit editing existing LUTs (AFAIK).” – Oleg Sharonov

What LUTs cannot do

An important thing I would like to add as a final note is that LUTs don’t completely eradicate the need for masks. You still need to use masks for isolating local corrections. Another limitation of LUTs is that they work only in RGB color model and in maximum 16 bits per channel. For other color models we need to use different approach.


Natural Outdoor Portrait Retouching in Photoshop

$
0
0

Learn how to retouch outdoor portraits using Photoshop. Part one covers “fixing hair, smoothing skin while retaining texture using frequency separation, and adding depth and sharpness with dodging and burning.”

And, in part two, they “finish off the image by working on details like the eyes and hair, sharpening, modifying the tone/colors of the image and adding some lens flare and bokeh.”

Color Grading and Color Correction in Photoshop

$
0
0

Learn color grading and color correction using the Color Balance tool in Photoshop.

Black and White Conversion for Portrait, Beauty and Fashion

$
0
0

Michael Woloszynowicz has an excellent new video showing how to convert photos to black and white using Photoshop. This style of conversion is particularly good for portraits, beauty and fashion shots.


Photoshop tip: Opacity vs. fill

$
0
0

In this video, I discuss the main difference between opacity and fill for layers in Photoshop. For instance, opacity can affect all layers (including layer effects) in an image, while fill only affects the layer content and not the layer effects. I’ll also show you how to create a “flare effect” using the fill option.

See more free videos samples and check out my Beauty & Hair Retouching DVD.

Photoshop tips: How to lighten skin

$
0
0

In this video, you’ll learn how to lighten an individual’s facial skin tone in Photoshop. The process involves duplicating the background, as well as adjusting the image’s overall saturation levels. With practice, this technique can be mastered rather quickly.

See more free videos samples and check out my Beauty & Hair Retouching DVD.

The Model Mayhem interview: Michael O

$
0
0

Michael O is a professional digital artist from Central California. His imaginative use of post-production software has garnered him quite a following, as most of his artwork — which exhibits a captivating blend of futuristic and classical motifs — is accomplished using photo-manipulation software. His work has been featured on several covers of Advanced Photoshop magazine, as well as various book covers for Macmillan and Little Brown & Company publishing. He also designs movie posters for the Bollywood film industry in India.

Michael’s submission won the Model Mayhem Banner Contest, and his work with Mosh greets everyone that visits MM. We recently had the chance to chat with Michael O about his life and art.


Model: Mosh

MM Edu: Tell us about your background and how you got started as an artist.

Michael O: My oldest memory of anything art related in my life happened back in kindergarten. I can remember drawing in class, wondering why my picture of Scooby Doo was more detailed than everyone else’s. I knew even then that art would always be in my life. While a lot of people do not know what they want to do halfway through college, I had a big head start and I let art lead me wherever it wanted.

MM Edu: I’ve read you describe your work as “Photo manipulation on steroids.” How did your work develop creatively?

Michael:  Although I do not condone steroid use in real life, I do try to inject as much of it as possible into all my work… and I have yet to see any negative side effects!

In the years prior to college (the late 1990s), my focus was on traditional art. My favorite style was photorealism and I would always find ways to cheat — like using a projector to trace photos onto a canvas and turn them into paintings. The style I use today is actually very similar to that. I start with a photo, and I “paint” directly on top of it. It is a simple process, but there are a few unique tricks and a few extra hours of detailing that separate my style from regular photo manipulation. The style really developed on its own while I played around in Photoshop, learning various techniques through trial and error.

Some people have asked why I choose to do photo manipulation rather than creating artwork from scratch, and I tell them that not only do I suck at drawing from memory, but also that removing the live model from my work would be removing the best part of the process. Knowing that another person is required makes the work feel more real to me, not just visually. It also gets me out of the office to meet new people, most of which are beautiful women. I have no regrets.

Under My Skin: This artwork required about 5 different shots pieced together in Photoshop in order to get all the hands placed in the right spots.

Model: Dani Bae

“I start with a photo, and I “paint” directly on top of it. It is a simple process, but there are a few unique tricks and a few extra hours of detailing that separate my style from regular photo manipulation.”

MM Edu: You have a futuristic style but it’s clearly influenced by classical art and sculpture — how would you classify your work?

Michael: I personally do not believe that art has surpassed or even matched the work created during the Renaissance. I find that artistic period to be the pinnacle of beauty and the best example of human ideals. I look up to artists like Michelangelo (no relation), who still inspires thousands through his work. I try to keep an eye on the big picture and if I devote my life to a timeless style of art, maybe hundreds of years from now, it will be my work that people are lining up to be inspired by. Not everyone was given a natural ability in art, so I have to use it responsibly and to the best of my ability in order to respect this gift that I was given.


Model: Maria Gruner


Model: Ranie Jade

“I personally do not believe that art has surpassed or even matched the work created during the Renaissance. I find that artistic period to be the pinnacle of beauty and the best example of human ideals.”

MM Edu: I’d like to talk about your creative process — from developing the concept to selecting the model and the specifics of the shoot.

Michael: One of the most important aspects of art to me is having a good concept. I try and think of ideas for art that need no explanation and can be clearly understood by anyone. Inspiration for a good concept can come from anywhere so I keep my eyes, ears and dreams wide open for ideas to come find me. I just have to remember to write them down.

I know that I am prepared to create a new image when I can clearly see the concept in my head. The actual look of the model is not vital, because so much can be changed in the computer. I try and keep photo shoots simple, not doing more than two or three concepts per model so that I do not get overwhelmed. For each concept I take about 50 photos, changing the lighting and poses until we get it right.

Models often tell me that I am physically demanding on them. I suppose that is because I try to keep them in one pose for a minute or so, and for some of my robotic images the poses are rather awkward. It helps if the model has an acting background because the facial expression is key, and that is one thing that is very hard to change in the computer.

Ever since I’ve been shooting, I have been using a 10D, which was one of Canon’s first digital cameras. It is nothing special as far as quality and features go, but super high quality photos are not a vital part of my work. In fact, one thing that I have learned over time is that people love to see the before photo that I use for the artwork. The more plain and simple the photo is, the more impressed they are by the transition.

Two Locks, One Key: This was a funny shoot because we were in Central Park and every now and then a tourist would pass us and a few seconds later I would hear their camera click behind me.


Model: Kess M

“One of the most important aspects of art to me is having a good concept. I try and think of ideas for art that need no explanation and can be clearly understood by anyone.

MM Edu: And, let’s talk about your process after the shoot. How do you turn those raw images into such incredible pieces of art?

Michael: Like my stubbornness to upgrade my photography equipment, my workstation is the same. I use Photoshop CS2 (and I would probably still be using an older version if my computer could run it). I use only the most basic tools so there is really no need for the latest and greatest. Those who expect the computer to be a magic box are often disappointed when I tell them that everything in high-quality work is done from scratch and it takes years of practice.

I also use a mouse 95 percent of the time. I have a tablet and I use it for long strokes for elements like hair but other than that I have no use for it, and frankly I do not know how designers can use them all the time. Whatever works I guess.

The digital process can take between 10 and 25 hours per image. I always try and spread it out over a few days so I can sleep on it and come back to it with a fresh pair of eyes.

I designed this desk in 3D Max and had a local craftsman build it for me. The monitor on the left is for one computer that I use for music and email. The center monitors are connected to my main computer, which is where I do all my work.

MM Edu: You often shoot overseas. How does traveling affect you creatively?

Michael: I have not been able to put my finger on it, but I believe there is a connection between traveling and artistic inspiration. I almost feel like a different person when I travel, my emotions are heightened. Combine that with exotic locations and exotic models, the output during my travels has become some of my most successful work.

Soul Searching, in New Zealand

Model: Megan Solomon


Model: Maria Shanti


Model: Maria Shanti

Hong Kong: I bought her this dress for $12 and we walked around and shot in some of the touristy areas of town. Everyone kept asking if she was a famous model. Of course, I told them yes!

Shooting in Moscow, Russia None of the models I worked with there spoke English, so my instructions needed to be translated.

Photographer:  Olya Kraynova


Models: Olya Kabulova & Natasha Semenova in Russia


Model: Rebecca Davies-Jones

MM Edu: What advice do you have for aspiring digital artists?

Michael: For those who are looking for a career as a freelancer, this is my advice.

  1. I would first recommend honing your traditional art skills to a level you are happy with before making the transition to digital. The methods are the same and the knowledge you gain from traditional rules (like composition) will pay off when it comes time to go digital.
  2. No client has ever cared where I live. As long as you have an internet connection, you can live wherever you want.
  3. For program learning, I would recommend The Gnomon Workshop DVD tutorials. They have plenty of step-by-step lessons focusing on all aspects of digital art. But, if you are more like me and not interested in this teaching method, I would recommend a few years of trial and error and a lot of elbow grease!
  4. For real professional artists, skill in art is only half the battle. A strong understanding of modern global business practices is necessary in order to find clients and keep them. Things like missing deadlines and making excuses are not tolerated.
  5. Get your work onto as many community-based websites as possible. You never know who might see your work there. That is actually where most of my clients first saw my work.
  6. Do not expect to get rich by selling your work in a gallery. With digital art there is no original piece of art so the best you can do is sell prints or merchandise.
  7. Lastly, find your own style that suits your artistic desires. I do not believe I would have any satisfaction with my own art if people told me that it looked just like someone else’s.

MM Edu: Model Mayhem is as essential platform for your work, can you tell us how you use MM and what it means to you?

Michael: After about a year of developing my digital style using stock photos, I went out in search of my own models. Model Mayhem was the obvious choice for that and I have been using it continuously ever since. Not only has it been an essential part of making my artwork happen but it also gave me the first few commissioned jobs from photographers who saw my work here and wanted to pay me for my services. At one point, more than half of my income was coming from commissions through MM. On top of that, I have made some lifelong friends here who share my passion for art and photography.

If there is a downside to the process of finding a model, it’s that I only get a response from about 20 percent of the models I contact. So, I contact about five models expecting to hear back from one. After that, there is still a big hurdle to making the shoot happen. I find that the models that are most likely to show up are those who answer all my questions and include their phone number in messages.

If I do get a response from more than one, I will pick the model that seems the most enthusiastic about art, will bring the most life to the work, and is not just a pretty face.

Original photo by Terry Divyak: This was a birthday present for his daughter and it was the first artwork commission I ever had.

Original photo by Terry Divyak

MM Edu: Your submission was selected to be the new Model Mayhem banner. Can you tell us about that shoot with Mosh?

Michael: That shoot was actually a classic Model Mayhem story…

It took place in 2007 when I was pretty green when it came to photography. My trusty 10D and I were headed to Washington D.C. to visit a friend and, (as with most of my travels) I contacted a few models through MM in hopes of having a shoot while there. I came across Mosh’s portfolio and, like everyone, I was instantly impressed with her work. She responded happily and was interested in shooting. I did not have any lighting equipment, so I was expecting to shoot outside, but she knew someone with a studio. I was glad to hear that but when I arrived, it ended up being someone’s studio apartment and not a photography studio!

My 50mm lens on a cropped sensor body made it pretty difficult to shoot at that focal length in such a small space. We had to move some furniture around but we made it work. The guy who owned the place had an Alien Bee which was all I needed. I brought some pictures of poses for Mosh to emulate, but she did not need them. All I had to do was sit back and click away. Every shot was a keeper and I am not surprised that she has become such a big name in the modeling world.


Model: Mosh


Model: Mosh


Model: Mosh

MM Edu: And, how do you feel knowing your work is in front of everyone that comes to MM?

Michael: I have had a number of honors over the years but winning this banner contest feels special to me since Model Mayhem has been such an important part of my career. I am sure that every time I log in I will have a little smile on my face.

MM Edu: Well, thanks for your time and congratulations! We obviously love your work and think everyone else will too.

Michael: Thank you.

How to Use Curves in Photoshop to Dodge, Burn and Color

$
0
0

Dodging and burning your images through curves adjustment layers is a great way to ensure that the toning you’re applying is actually consistent with your source photograph. On colored lighting shots, like the one in the video, you can also add color through the color channels in your curves adjustment layer. This enables you to color the shadows and highlights to match the rest of the image.

Photographer: Jake Hicks; Model: Zuki Jai


Photoshop Tips: How to Dodge and Burn Like a Pro

$
0
0

In this tutorial A-M-P shows how to dodge and burn like a pro. If you’re still using the dodge and burn tools in Photoshop you need to watch this tutorial.

7 Tips for Aspiring Digital Artists

$
0
0

Michael O is a professional digital artist whose work has been featured on several covers of Advanced Photoshop magazine, as well as various book covers and movie posters.


Model: Shannon Shhhhh; Digital Artist: Michael O

We interviewed Michael O and asked for his advice for those who are looking to start a career as a freelance digital artist.

Learn Traditional Art Skills

I would first recommend honing your traditional art skills to a level you are happy with before making the transition to digital. The methods are the same and the knowledge you gain from traditional rules (like composition) will pay off when it comes time to go digital.

Location, Location, Location – Not for Digital Artists

No client has ever cared where I live. As long as you have an internet connection, you can live wherever you want.

Program Learning

For program learning, I would recommend The Gnomon Workshop DVD tutorials. They have plenty of step-by-step lessons focusing on all aspects of digital art. But, if you are more like me and not interested in this teaching method, I would recommend a few years of trial and error and a lot of elbow grease!

Business Skills

For real professional artists, skill in art is only half the battle. A strong understanding of modern global business practices is necessary in order to find clients and keep them. Things like missing deadlines and making excuses are not tolerated.

Online Community

Get your work onto as many community-based websites as possible. You never know who might see your work there. That is actually where most of my clients first saw my work.

Prints and Merchandise

Do not expect to get rich by selling your work in a gallery. With digital art there is no original piece of art so the best you can do is sell prints or merchandise.

Develop Your Own Style

Lastly, find your own style that suits your artistic desires. I do not believe I would have any satisfaction with my own art if people told me that it looked just like someone else’s.

Read the full interview with Michael O.


Digital Artist: Michael O; Model: Mariel Zagunis (Two time Olympic Gold Medalist)

Viewing all 30 articles
Browse latest View live


Latest Images